Consultant Desk Essentials: Build Your Client-Ready Setup
By Priya Menon • 12th Apr
Your desk is your professional stage. Whether you're hosting a video call with clients or sending a photo of your workspace to land the next contract, consultant desk essentials must balance function, trust, and fit (not just aesthetics or price tags). The challenge isn't finding pretty accessories; it's assembling a setup that physically works within your constraints while signaling competence and preparedness to the people who pay you.
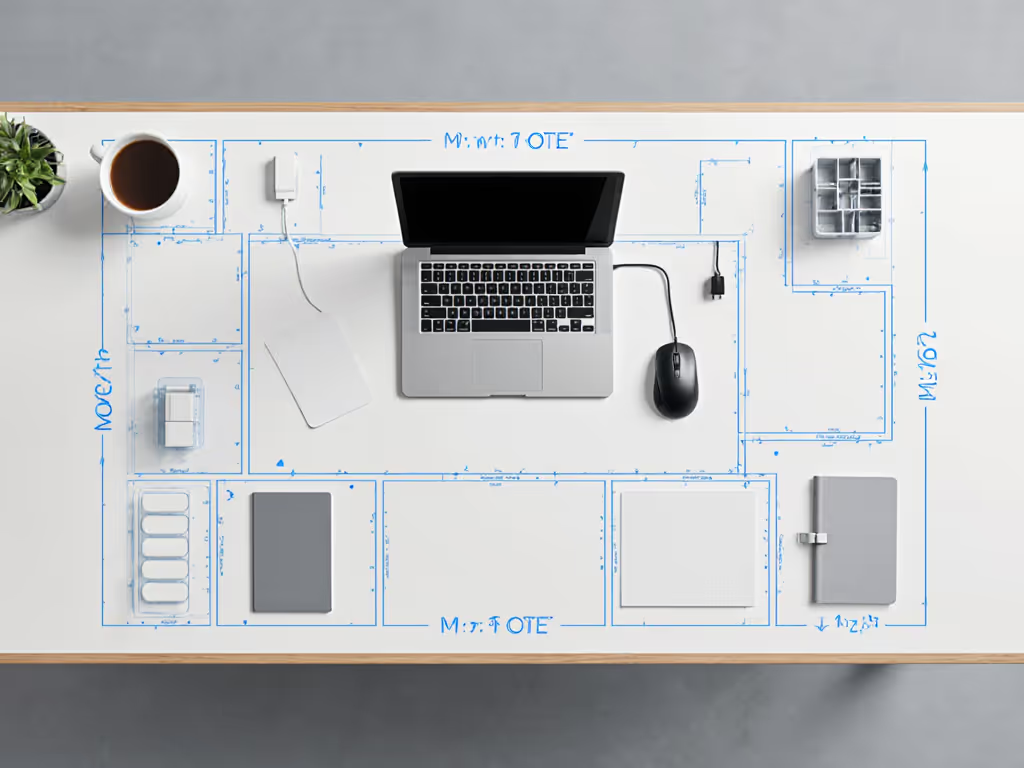
Most consultants and freelancers start with chaos: a borrowed chair, tangled cables, and a monitor arm that barely clears the wall behind their desk. They buy first, measure later, and end up returning half their purchases. I learned this the hard way. When I moved into a rental with a narrow desk and a 2-inch overhang, my dream clamp mic arm was a non-starter. Instead of returning it, I drafted a one-page starter fit map (recording my desk depth, crossbar position, and safe mounting zones). That single discipline transformed every accessory decision afterward. Start with a fit map; buying gets calmer and cleaner. For a deeper walkthrough on planning dimensions and personalization, see our fit-first customization guide.
This guide walks you through building a freelancer workspace solutions setup using measurement-first logic, plain-language checklists, and upgrade notes so you buy once, add smart, and never wonder if something will fit.
Step 1: Map Your Physical Constraints
Before you buy a single accessory, you need a baseline. This isn't complicated, but it's non-negotiable.
Measure Your Desk Foundation
Grab a tape measure and record these dimensions in a notes file:
- Desk depth (from front edge to back edge, in inches)
- Desk width (left to right)
- Desktop thickness (critical for clamp compatibility)
- Underside clearance (distance from floor to desk bottom; affects under-desk organizers and cable trays)
- Rear crossbar or cable management spine (if present, measure its height from the floor and distance from the back edge)
- Distance from desk to wall behind it (determines monitor arm reach and cable routing)
- Chair arm height and width when seated (will it collide with a tray or keyboard tray?)
Write these down. Take a photo of your desk from above. This is your safe zones map (the visual constraint that anchors every decision).
Document Your Current Workflow Collisions
For one week, notice friction points:
- Where does your elbow hit when you type?
- Where do papers, notebooks, or sticky notes pile up?
- Where are your power outlets, and is the cord run messy?
- What causes you to lean forward or twist?
- What makes you lose focus because it looks cluttered?
These aren't complaints; they're data. They tell you which accessories solve real problems, not aspirational ones.
Step 2: Establish Your Core Zones
Consultants need their desk to do at least three jobs: host video calls (client-facing aesthetics), handle focused work (ergonomic comfort), and store active projects (accessible organization). Divide your desk into logical zones, each with a purpose and no collisions.
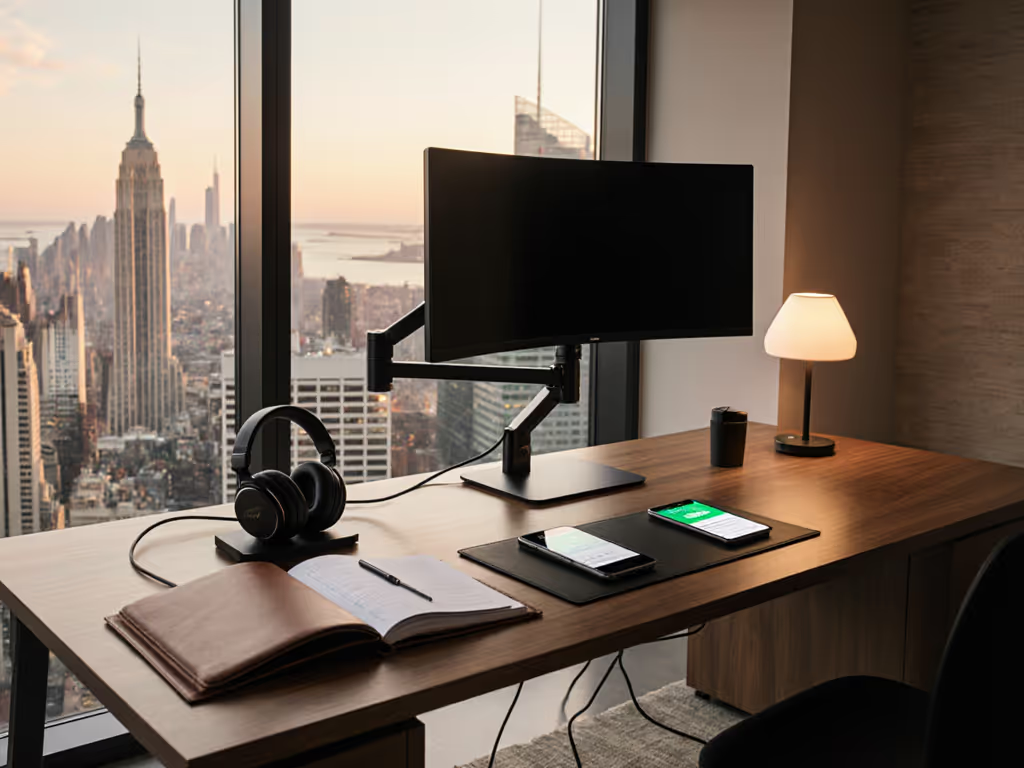
Client Presentation Zone
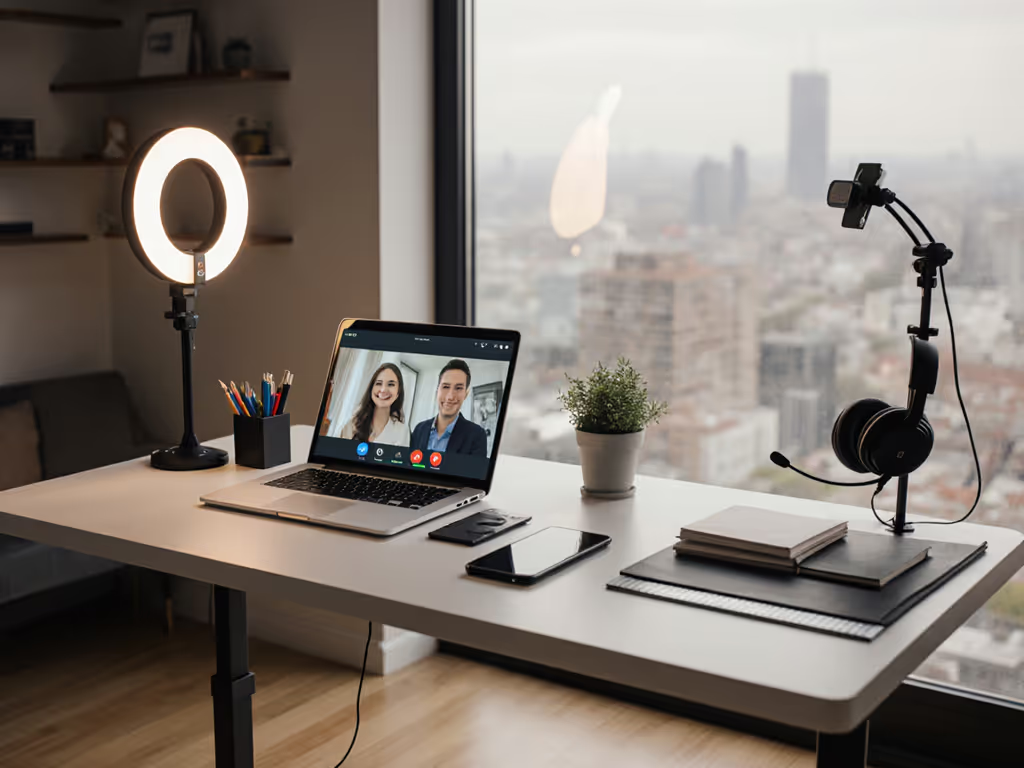
This is the area visible on your video call background (typically the upper-center third of your desk, behind your keyboard and monitor). This zone must be clean, organized, and distraction-free. For on-camera polish, see our video call desk essentials for lighting, framing, and audio picks that integrate cleanly.
What belongs here:
- Monitor (or monitors)
- Monitor light bar (soft, glare-free lighting that makes you look professional)
- Perhaps a small plant or desk pad (adds calm, hides desktop blemishes)
What doesn't belong:
- Coffee mugs, sticky notes, or loose papers
- Cables (they should route under-desk via cord organizers)
- Stacks of folders or reference materials
Active Project Zone
This is your left or right flank (where you keep the project file, reference notebook, or secondary input device you're using today). It's accessible but not on camera.
What belongs here:
- Notebook and pen holder (for quick reference notes)
- A paper tray (for documents that need attention today, separate from archival files)
- A desk drawer organizer (for pens, clips, and small supplies)
- Perhaps a small filing stand for current contracts or briefs
Upgrade note: If you work with multiple clients simultaneously, a project management workspace tools approach means each project gets a labeled folder or small tray in this zone. This prevents cross-client mix-ups and makes photo documentation for billing or hand-off clean and professional.
Power and Cable Zone
This is the back and underside of your desk (invisible but critical). Poor planning here cascades into all other zones.
What belongs here:
- Power strip (positioned so all cords feed from one point)
- USB hub (consolidates charging and data into one uplink to your laptop or computer)
- Cable organizer or management box (bundles and labels cables so you can trace and adjust without chaos)
- Under-desk cable tray or clip system (keeps wires off the floor and chair wheels)
Renter-safe note: Use adhesive cable clips or clip-on organizers instead of drilling. They hold firm and peel off without damage.
Step 3: Choose Your Ergonomic Foundation
Before adding accessories, nail the core three: desk height (or standing desk option), monitor height, and keyboard/mouse position. Misaligned ergonomics ruins even the best accessories.
Monitor Height and Distance
Your monitor should sit at arm's length away (roughly 20-26 inches from your eyes) and the top of the screen at or slightly below eye level when you sit upright.
If your monitor is too low, use a laptop stand (adds height and creates storage beneath for a keyboard/mouse). Not sure which elevation option fits your space? Our monitor stand vs shelf riser guide breaks down ergonomics, storage, and cable routing. If it's too high, reposition your chair or add a footrest to raise your thighs.
Plain-language measurement:
- Sit upright in your chair.
- Close one eye and look straight ahead. The top of your monitor should align with your gaze or sit 10-20 degrees below horizontal.
- If your desk is shallow (under 24 inches deep), you'll need a monitor arm (wall-mounted or clamp-mounted) to pull the screen forward and free desk space. This is where consultant desk essentials diverge from generic setups, because monitor real estate is precious.
Keyboard and Mouse Placement
Your keyboard should sit at a height where your elbows bend at roughly 90 degrees and your wrists stay neutral (not bent back or down). For most people, this means the keyboard is 28-30 inches from the floor.
If your desk is higher, use a keyboard tray that clamps under your desk. If it's lower, raise your chair and add a footrest so your feet don't dangle.
Upgrade note: A comfortable keyboard like Logitech MX Keys can improve typing feel over an extended day, but only after height is correct. Buying a fancy keyboard to compensate for poor ergonomics is a common misstep.
Step 4: Select No-Drill Mounting and Cable Management
For renters and consultants who move frequently, mounting must be flexible, non-destructive, and rock-solid. This is non-negotiable.
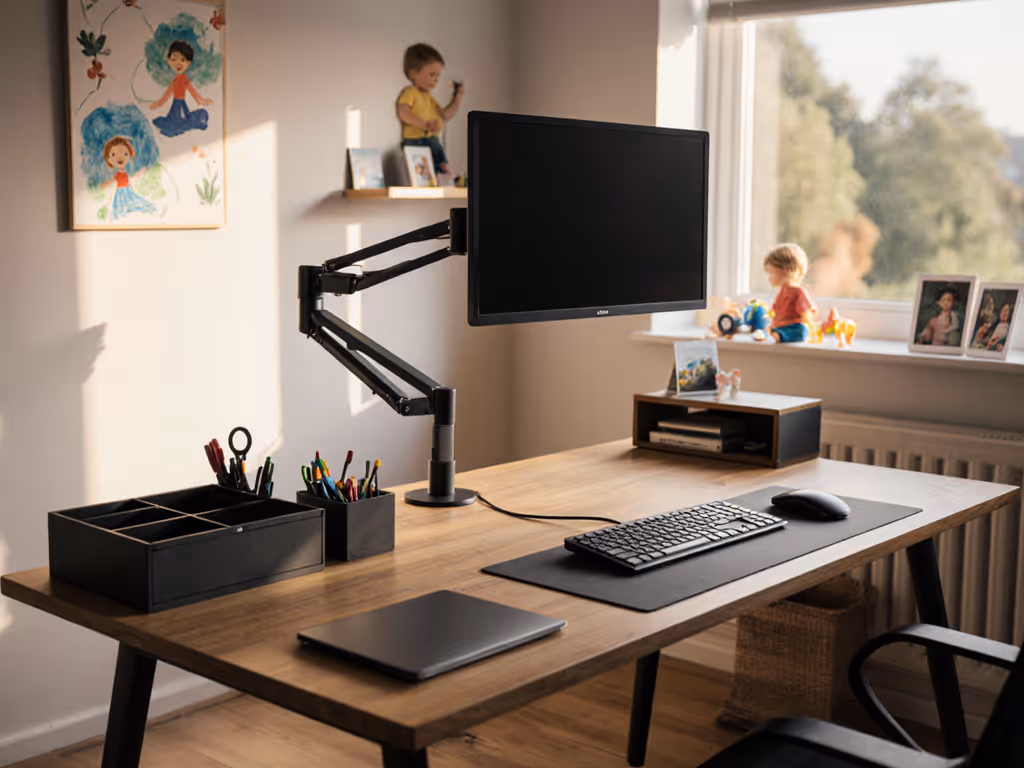
Monitor Arms and Stands
A monitor arm achieves three things: it frees desk surface, lets you angle the screen for your exact viewing height, and can swing the monitor out of the way if you need desk space for a client meeting (laying out documents, for example).
Safe zones save returns. Before buying a monitor arm, verify:
- Your monitor's VESA mounting pattern (the four screw holes on the back, standardized at 75 mm or 100 mm)
- Your monitor's weight (the arm must support it, typically 4-14 pounds for 24-27 inch screens)
- Whether the arm clamps to your desk or mounts to the wall
- Clamp desks must be 24-80 mm thick (common range; verify your desk falls here)
- If your desk has a rear crossbar, the clamp must clear it or mount in front of it
A monitor light bar mounted above your monitor (or on an arm) provides task lighting that doesn't create glare on the screen. This is crucial for video calls where harsh shadows or reflections hurt your professional image.
Cable Trays and Management Boxes
Under-desk cable organization is the difference between a setup that looks composed and one that feels chaotic. For product-by-product comparisons and install tips, see our cable management systems guide.
What to use:
- Adhesive cable clips (peel-and-stick, renter-safe, hold firm for 6+ months)
- Under-desk cable tray (clips to the underside, corrals all power and data cables in one bundled path)
- Ultimate Cable Management Box (consolidates power distribution and USB hubs in one labeled unit, reducing the number of individual items under your desk)
- Cord wrap organizers (split sleeves that bundle cables and let you add or remove wires without rewiring everything)
Plain-language routing:
- Identify where your power outlet is (usually near a wall).
- Run power and data cables from your devices to a power strip/USB hub positioned closest to that outlet.
- Use a cable tray to run all bundled cables along the rear or side of your desk, parallel to your crossbar if present.
- Label each cable at both ends (masking tape + pen works fine).
- Secure clips every 12 inches so cables don't sag or tangle.
This discipline means you can reconfigure your desk (add a monitor, swap a keyboard, adjust heights) without redoing the entire cable run.
Step 5: Layer Organization and Storage
Now that your ergonomic foundation and power routing are set, add storage that keeps active work visible but not chaotic.
Desk Surface Organization
Notebook and pen holder: Keep one premium notebook and a single pen set visible on your desk in your active project zone. This signals preparedness during video calls and keeps a note-taking tool within arm's reach.
Paper tray: A vertical paper tray prevents documents from spreading across your desk. Use it to hold contracts, invoices, or client briefs that need action today. Archive everything else into drawers or a filing cabinet.
Desk pad: A quality desk pad (like the DeltaHUB Desk Pad referenced in recent productivity guides) defines your workspace visually, hides minor desk damage, and gives you a wrist rest for mouse/trackpad work. Choose a neutral color (charcoal, navy, or natural wood tone) that complements a video call background.
Drawer and Under-Desk Storage
Desk drawer organizer: Use one to store pens, mechanical pencils, paper clips, sticky notes, and other small supplies. The goal is one-glance access without clutter spilling onto your surface.
Swivel pencil drawer (as noted in recent desk accessory guides): This slides under your desk and holds supplies you use less frequently but want accessible for projects.
File organizer: A small filing stand (plastic or metal) holds active project folders so you can grab them without walking to a cabinet.
Upgrade Notes
- Reusable water bottle: Hydration improves focus and reduces headaches from screen strain. Keep one within arm's reach but not on your desk surface (use a bottle holder or side table).
- Footrest: If your chair is high or your feet dangle, a footrest prevents leg fatigue and back pain. This is especially important for consultants who spend 6-8 hours on video calls without moving.
- Desk trash can: A small waste bin prevents paper and packaging clutter from accumulating. Position it to the side so it's not visible on camera.
Step 6: Optimize for Freelance Professional Branding
Your desk is part of your professional identity. Every visible element communicates credibility to clients and collaborators.
Visual Cohesion
- Match finishes and colors: If your monitor stand is black, your desk pad and pen holder should harmonize (black, charcoal, or natural wood, not bright colors that clash).
- Minimize visible wires: All cables should disappear under your desk or behind your monitor. Exposed cables create visual noise that reads as disorganization.
- Lighting angle: Position your monitor light bar so it illuminates your face and work surface during video calls, not pointing at your camera (which causes glare and harsh shadows).
Independent Contractor Office Essentials
Beyond physical ergonomics, your desk should communicate trust:
- A clean, uncluttered background: Only you, your monitor, and perhaps one plant or piece of art visible on camera.
- Professional keyboard and mouse: These are visible during many calls. A wireless keyboard (like Logitech MX Keys) and a precision mouse show attention to detail.
- Consistent framing: Your camera should be at eye level (use a monitor stand or laptop arm to achieve this), so clients see you directly, not looking down at them.
- Ambient sound control: If your desk is in a shared space, use a small ambient light or sound-dampening panel to signal professionalism and minimize distraction for video calls.
Step 7: Build Your Upgrade Roadmap
Consultants' needs evolve. You might add a second monitor, switch to a standing desk, or integrate a podcast microphone. Plan for this now so your foundation supports future additions.
Single-Monitor to Dual-Monitor Transition
If you might add a second screen:
- Choose a monitor arm that supports two monitors from the start (or buy an expandable model, not a fixed single-monitor clamp).
- Ensure your desk depth accommodates two side-by-side monitors. Typical 27 inch monitors are 23 inches wide; two of them plus bezels equal about 47 inches. Check you have at least 48 inches of desk space.
- Verify your power distribution: Two monitors need two power cords. Ensure your power strip has at least 6-8 outlets (you'll also need power for your computer, keyboard, light, and phone).
Standing Desk Consideration
If you might upgrade to a standing desk or standing converter in the future: When you're ready to choose, our premium vs budget standing desks comparison details stability, motor quality, and long-term value.
- Use a monitor arm instead of a fixed monitor stand, so the monitor adjusts height with your desk.
- Route cables in a way that allows vertical movement (a cable tray on a rail, or clips that slide up and down, not fixed clips).
- Choose a keyboard arm that adjusts height independently so your wrists stay neutral whether you're sitting or standing.
Microphone and Lighting
If you plan to record video or host podcast-style client calls:
- Mount a boom arm (like a mic boom on a scissor clamp) high above your desk and away from your monitor, so it's not visible on camera.
- Position your monitor light bar so it doesn't hit the microphone or create harsh shadows on your face during recording.
Step 8: The First-Time Buy Checklist
Once you've mapped your space and understood your constraints, here's your priority order for freelancer workspace solutions purchases:
Week 1 (Ergonomic Foundation):
- Monitor arm (if needed for height/depth) or monitor stand
- Keyboard (at correct height)
- Monitor light bar
- Chair (if you don't have a supportive one)
Week 2-3 (Cable and Organization):
- Power strip and USB hub
- Under-desk cable tray
- Adhesive cable clips
- Desk drawer organizer
- Paper tray
Week 4+ (Refinement):
- Desk pad
- Pen holder
- Footrest
- File organizer
- Reusable water bottle
This staggered approach lets you validate each purchase before adding the next. If the monitor arm doesn't fit, you catch it before buying cable management around it.
Actionable Next Step
Don't buy anything today. Instead:
- Print or open a notes file and title it "Desk Fit Map."
- Record your desk measurements: depth, width, thickness, underside clearance, rear crossbar (if present), wall distance.
- Add your ergonomic constraints: chair height, arm reach, viewing distance to your wall.
- Take three photos: top-down view of your desk, side view of your seating and monitor position, and a zoomed view of your rear wall and desk back.
- List your current friction points: Where do you feel pain? Where do cords tangle? What makes video calls stressful? What makes you lose focus?
Once you've done this (which takes about 20 minutes), you'll have a one-page constraint document that eliminates guesswork from every purchase. Email it to yourself or store it in your phone. Before you click "buy" on any desk accessory, cross-reference your constraint map. Safe zones save returns. That discipline transforms your desk from a source of stress into a platform for professionalism, client confidence, and your best work.
Your consultant desk essentials setup isn't about the fanciest gear or the highest price tag. It's about the clarity that comes from measuring first, understanding your future, and building piece by piece. Start with a fit map. From there, buying gets calmer and cleaner.
Related Articles